In this post I provide a few tips on fixing a laptop after liquid spill.
IMPORTANT: If you spilled something on your laptop you should stop using it right away, even if the laptop appears to be running good. Right after the spill you should turn it off, unplug the power adapter and remove the battery. The laptop should be disassembled as soon as possible and all internal parts should be inspected for liquid damage.
Liquid spills are very unpredictable and even a small amount of liquid spilled on the laptop can cause a serious damage.
IF YOU SPILLED A SMALL AMOUNT OF LIQUID ON THE KEYBOARD
Let’s say you spilled less than a teaspoon of liquid on the keyboard and the keyboard stopped working properly, but anything else works fine.
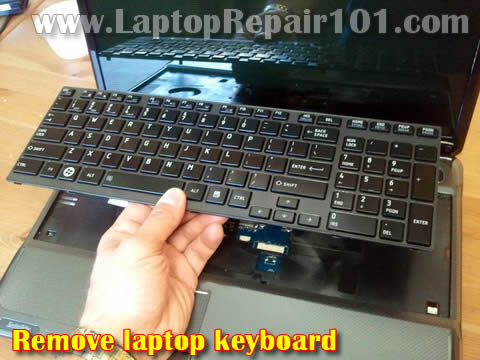
It that’s the case, it could be enough to remove just the keyboard for the liquid damage inspection. Turn off the laptop, unplug the AC adapter and remove the battery. Now remove the keyboard and take a closer look underneath.
In this guide I explain how to recover files from a laptop (or desktop PC) with crashed, failed, damaged operating system.
WHEN CAN YOU USE THIS RECOVERY GUIDE?
1. The guide will work if your operating system damaged but the laptop (or desktop PC) hardware still works fine.
2. The guide might work if the hard drive has some minor damage, like a few bad sectors.
2. The guide might work if the hard drive has some minor damage, like a few bad sectors.
PREPARING FOR RECOVERY
For this recovery I’ll be using a Ubuntu CD (Linux OS). Also, you can create a bootable Ubuntu USB stick and use that instead of the CD. Don’t worry, you don’t have to be a Linux guru for that. The interface will be very similar to Windows OS.
You’ll need another working computer to download and create a bootable Ubundu CD or USB stick.
1. Download the latest version of Ubuntu OS here. When you click on the download button you’ll start downloading an ISO image.
2. Burn this ISO image on a CD or create a bootable USB stick. It’s explained on the same Ubuntu download page, just scroll a little bit down.
3. Find the target drive where you going to save recovered files. You can use an external USB hard drive or USB memory stick. The target drive can be formatted with any common Windows file system: FAT, FAT32, NTFS.
In this post I explain how you can fix a laptop motherboard with failed NVIDIA graphics chip. This repair might apply to some HP/Compaq laptops and probably some other laptop brands. If this repair works for your laptop, please mention the brand and model number in comments after the post. This will help other readers with similar laptops.
This method should work for the following models: HP Pavilion dv2000, Pavilion dv6000, Pavilion dv9000, Compaq Presario v3000, Presario v6000, HP Pavilion tx1000, Pavilion tx2000.
By the way, I just fixed my son’s Xbox 360 with red ring of death (error 74) using exactly same technique.
MOST COMMON PROBLEM SYMPTOMS
1. Laptop turns on with garbled video on the internal laptop screen and external monitor.
2. Laptop turns on as normal but there is no video on the internal laptop screen or external monitor.
2. Laptop turns on as normal but there is no video on the internal laptop screen or external monitor.
MY UNDERSTANDING OF THE PROBLEM
The NVIDIA graphics chip soldered to the motherboard. When the laptop gets very hot, the NVIDIA chip separates from the motherboard and laptop video fails.
HOW TO FIX FAILED NVIDIA CHIP
I have previous posts explaining how I fixed same problem by baking the motherboard in an oven or bubble-wrapping the laptop. But today I’m going to fix the motherboard using a heat gun. Basically, I’m going to heat up the NVIDIA chip with a heat gun to solder it back to the motherboard (reflow). I think this method is more reliable and the repair should last for a while.
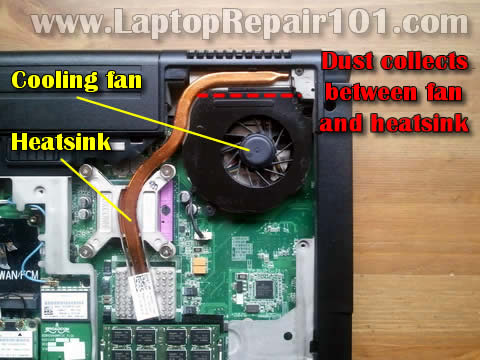
My laptop runs very hot and eventually turns off or freezes – this is one of the most common complaints I have been receiving from my customer for many years. Why it’s happening? Is there an easy fix for that?
Most likely this problem is heat related. Take a look at the following picture.
Laptop screen started showing strange or wrong colors. What could be wrong? I’ve been asked this question many times and today I’m addressing the issue.
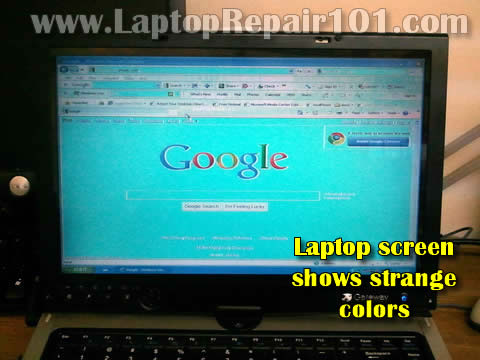
In this post I explain some basic troubleshooting techniques in case if your laptop screen started showing strange or incorrect colors.
You have to know how to disassemble the laptop in order to use following troubleshooting techniques.
You have to know how to disassemble the laptop in order to use following troubleshooting techniques.
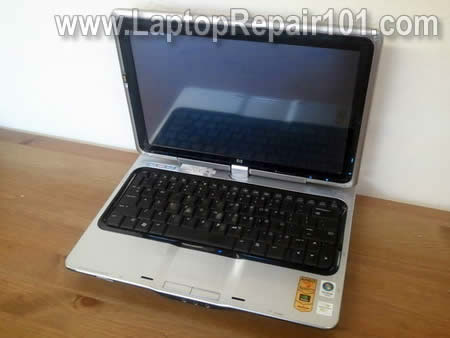
In this post I explain how you can fix a known video problem on some HP laptops without actually taking it apart. Most likely the fix is not permanent but this will buy you some time, enough to backup personal files or even use the laptop until you get a new one. There is no guaranty this fix work 100%.
Here are some HP models affected by this known video failure problem: HP Pavilion dv2000, dv6000, dv9000, tx1000 tablet PC, Compaq 700, v3000, v6000 and probably some others.
If you know more models, please mention them in comments after this post.
CAUSE OF THE PROBLEM:
As I know, the video problem somehow related to NVIDIA chip located on the motherboard. Overtime the NVIDIA chip separates from the motherboard and the laptop video fails.
In this post I explain how to troubleshoot laptop battery charging problems. I will list most common battery failure examples and suggest some troubleshooting steps.
Example 1.
Laptop detects the battery but shuts off when AC adapter unplugged.
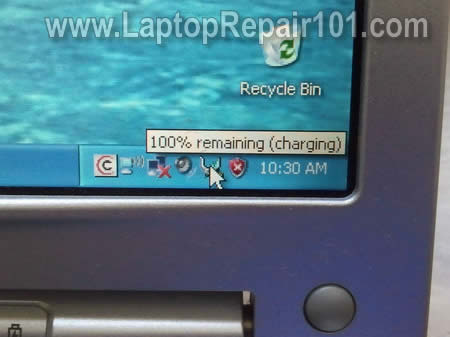
When you move the cursor arrow over the battery icon while the laptop is connected to AC adapter, it show the remaining battery charge and says “charging”.
Here’s how I fixed a Compaq Presario V6000 motherboard with “no video” issue. Not sure if this fix will last forever but it works and the laptop is back to life.
Also, this fix might work for the following HP/Compaq laptop motherboards: HP Pavilion dv2000/dv6000/dv9000, Compaq Presario V3000 and probably some other models.
WARNING!
This repair might be harmful for your health and baking motherboard in an oven could be a bad idea. It could be toxic. I don’t know if it is or not. I did this repair for myself, at my own risk. I’m just sharing my experience. If you decide to fix your motherboard the same way, please do it at your own risk.
This repair might be harmful for your health and baking motherboard in an oven could be a bad idea. It could be toxic. I don’t know if it is or not. I did this repair for myself, at my own risk. I’m just sharing my experience. If you decide to fix your motherboard the same way, please do it at your own risk.
Again, proceed at your own risk. Otherwise, close this page and take your laptop to the professional repair shop.
FIXING “NO VIDEO” ISSUE BY BACKING THE MOTHERBOARD.
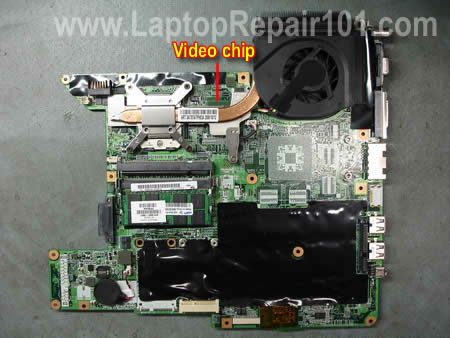
Problem description: I had an abandoned Compaq Presario V6000 laptop. The laptop was turning on when I press on the power button but after a few seconds turning off by itself. There was no video on the laptop screen or external monitor. I tried another AC adapter, new memory modules but it didn’t help. I was pretty sure this is motherboard related failure.
How to disassemble a laptop keyboard? Can I take it apart and clean liquid spill? Is it easy to repair a damaged keyboard?
I’ve been getting these questions many times and today I show how to disassemble a laptop keyboard. You decide if it’s possible and easy or not. 
By the way, in one of the previous posts I explain how to fix individual keys on a laptop keyboard.
I’m doing it for fun. I’m working on a damaged keyboard and have no intention to use it in the future.
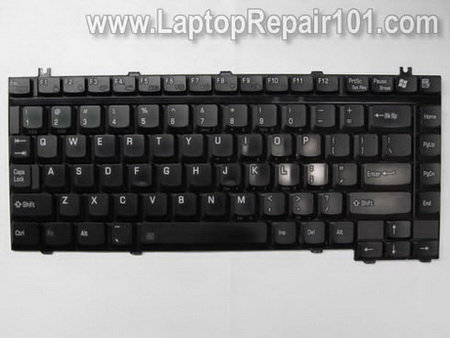
First of all, you’ll have to remove the laptop keyboard.
This guide explains how to fix a broken keyboard connector on a laptop motherboard. I do not claim that my instructions will work for any connector type in any laptop brand, but if I can help a few people, I can call my mission accomplished.
Let’s say the keyboard in your laptop stopped working properly and you decided to install a new keyboard yourself. You disassembled the laptop, removed the keyboard, tried to unlock the keyboard connector and… OHH! MAN!… a piece of the locking clip on the connector got broken!
What can you do? Unfortunately, you don’t have a lot of options. The keyboard connector is permanently soldered to the motherboard and cannot be replaced at home. If the connector was damaged, you’ll have to replace the whole motherboard, use the laptop with an external USB keyboard, or…. try the following trick. Hopefully it works or you.
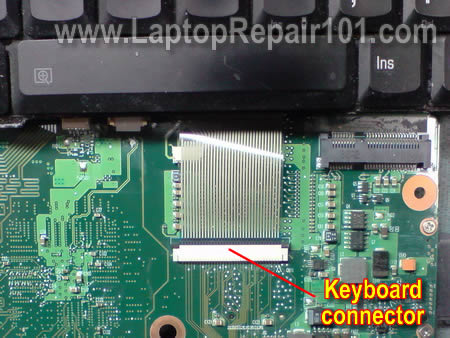
The keyboard cable is locked inside the connector on the motherboard. In order to remove the keyboard, you have to unlock the connector and release the cable.
No comments:
Post a Comment